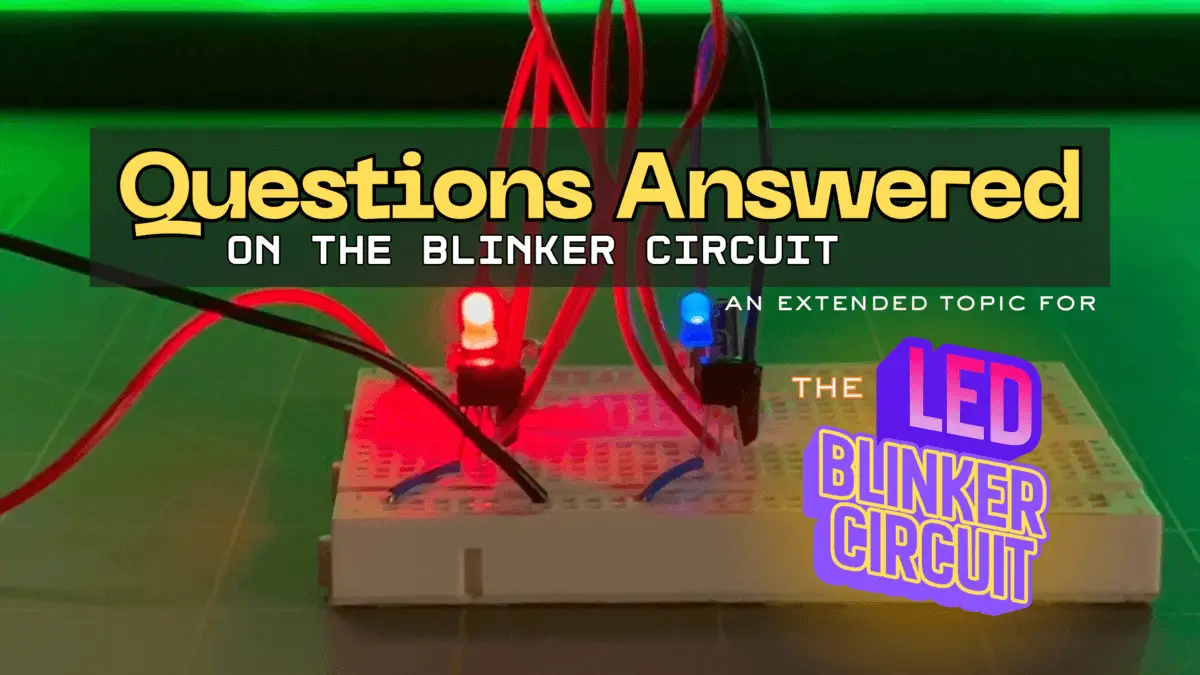
Questions Answered on the Blinker Circuit (An Extended Topic for the LED Blinker Circuit)
Introduction
The following content is intended to be a companion to the LED blinker circuit we created from our article titled, “How Components Work Together in Real Circuits.”
The sole purpose of this discussion is to work as an extended topic for that article to help you understand your circuit better, to help clarify what’s actually happening within it, and to gain a deeper understanding of its inner workings.
The following is meant to be thorough, and codified in a way to be understandable to any reader, no matter their background, thought process, or way of learning — at least we hope that it is. There have been several different attempts to express the content for this discussion here in hopes to be accessible for all.
We hope that you find the following to be useful.

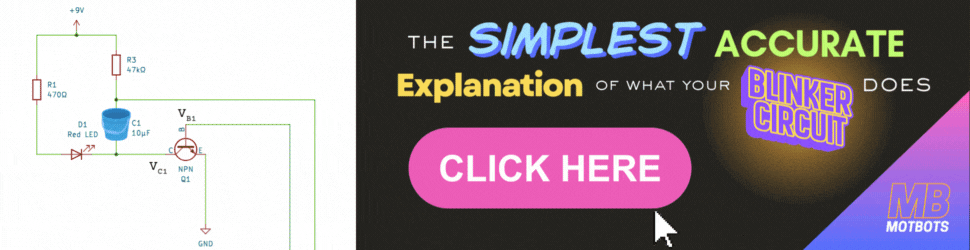
🗺️ The LED Blinker Circuit Schematic
I’ve provided the LED Blinker Circuit schematic here, so that we may refer to it throughout our discussion. Click on the image so that you may open it in another tab to download it, if you need to.

😎 Why The LED Blinker Circuit Is Cool
This tiny circuit we made back in How Components Work Together in Real Circuits, demonstrates several fundamental electronic principles all at once:
- How resistors control current
- How capacitors store and release energy
- How transistors amplify or switch
- How components influence each other across different parts of a circuit
- How timing and behavior can emerge from simple parts
- How analog electronics can create patterns without any digital logic
In other words, our circuit electronic components work as a team. An individual component can’t do much on its own:
- A resistor can’t blink.
- An LED can’t blink.
- A capacitor can’t blink.
- A transistor can’t blink.
But together? They can make a rhythm, a pattern, and a little light show. It’s a great example of how components work together to create circuits.

🧠 Remembering What the LED Blinker Circuit Does
In the previous discussion we had on our LED Blinker circuit, there we several examples given to show how the circuit performs in its sequence when power is added to it. I highly suggest you take a moment to go check out that article titled, “What Exactly Is an Astable Multivibrator?,” before continuing on this one.

But just to give you an overview now, I’ll give in the clearest words possible a summary of what happens with our circuit:
- The circuit has two “sides,” each with a light.
- Only one side can be ON at a time.
- When one side turns on, it immediately pushes the other side off.
- Each side uses a capacitor — a part that slowly charges and drains — to control how long its “turn” lasts.
- When a capacitor finishes draining, it allows its side to turn ON again.
- When that side turns ON, it pushes the other side OFF.
- This back-and-forth continues endlessly.
- The LEDs flash because each side is turning ON and OFF in a repeating cycle.
It’s a perfectly balanced tug-of-war with a built-in timer.
▶️ The Sequence of Events of the LED Blinker Circuit (What’s Actually Happening)
In the previous article to this one, the sequence of events within our LED blinker circuit was described in detail, and an explanation of how it worked was given in general terms and in several ways.
In the proceeding of our topic of discussion here, a more detailed explanation of how our circuit works will be provided. For now, the following is the sequence of events within our circuit, given clearly and precisely:
- Q1 turns on first and the red LED glows
- Q1 turning on makes its collector voltage drop
- That drop gets passed through a capacitor to Q2’s base
- Q2’s base gets pulled low and Q2 turns off
- With Q2 off, its capacitor slowly charges
- Q2’s base slowly climbs until it turns on
- When Q2 turns on, its collector drops
- That drop travels through the other capacitor to Q1’s base
- Q1 gets kicked off and the blue LED glows
- Now the second capacitor slowly charges
- Q1 eventually turns back on
- The pattern repeats forever
This is why the LEDs blink alternately — a perfectly synchronized electronic seesaw.

This sequence of events is as was discussed under the section Understanding How Your LED Blinker Circuit Works — Explained In 3 Different Ways, in the previous article to this one, titled, “What Exactly Is an Astable Multivibrator?”
👣 Step-by-Step: How the Blinking Actually Happens
Now that we have the preliminaries for this new topic of discussion out of the way, let’s begin our process of diving deeper into our understanding of the LED blinker circuit. Let’s first start with how the blinking actually happens:
Referring to the schematic of the LED blinker circuit above, let’s assume Q1 turns on first (it doesn’t matter which — one will always “win” during power-up).
🔴 STEP 1 — Q1 turns ON, Q2 turns OFF
When Q1 turns on:
- Its collector voltage drops to near 0V (because it conducts to ground).
- That low voltage is fed through C1 into Q2’s base, pulling Q2’s base low.
- A low base voltage turns Q2 off.
So immediately:
- The red LED (D1) turns ON
- The blue LED (D2) turns OFF
This is exactly what you observe when either transistor dominates.
🔵 STEP 2 — Capacitor C1 charges, slowly releasing Q2
While Q1 stays on:
- C1 begins charging through R3, R1, and the upper supply path.
- As it charges, the negative “kick” on Q2’s base starts to fade.
- Q2’s base voltage slowly begins creeping upward.
This slow recovery is what sets the timing of the blink. Eventually Q2’s base reaches about 0.6V, which is enough to turn it back on. And that’s when everything flips…
🔁 STEP 3 — Q2 suddenly turns ON, which forces Q1 OFF
When Q2 switches ON:
- Its collector slams down to near 0V.
- This low voltage travels through the other capacitor (C2).
- C2’s negative pulse hits Q1’s base, dragging it toward ground.
- That drag shuts Q1 OFF instantly.
Now roles reverse:
- The blue LED (D2) turns ON
- The red LED (D1) turns OFF
🔄 STEP 4 — C2 now charges, pushing Q1 back ON later
The exact process repeats but mirrored:
- With Q2 ON and Q1 OFF, C2 charges
- Q1’s base slowly rises
- Eventually Q1 turns fully ON again
- Q2 gets knocked OFF through C1
- And the whole thing cycles endlessly
This makes each LED take turns blinking.
✨ Why It Blinks Instead of Staying On
You may be asking yourself, “Why do the LEDs blink instead of just staying on?”
There are two important facts that make the oscillation possible within the LED blinker circuit, and they are the following:
1. Cross-Coupled Capacitors = Time Delays
Referring to the circuit schematic for The LED Blinker Circuit, the timing capacitors (C1 and C2):
- Provide a sudden negative pulse when their connected transistor switches ON
- Then slowly charge, acting as timing elements
The capacitors react slowly — except when something changes suddenly (like voltage).
- Slow Changes in Voltage Across a Capacitor: If one side of the capacitor moves slowly, then the capacitor allows the voltage to “settle.”
- Fast Changes in Voltage Across a Capacitor: If one side suddenly jumps, then the capacitor throws that change (in voltage) onto the other side.
“Capacitors resist any sudden changes in voltage.“
In the LED blinker circuit:
- The slow part (charging) controls the timing.
- The fast part (kicks) flips who’s “in charge” of the blinking.
This combination is why the circuit oscillates — one transistor turning on forces the other to turn off, and then the capacitors slowly “count” until it’s time to flip roles.
If the capacitors were missing from the circuit, neither transistor would ever turn off — both LEDs would try to stay ON.
2. Two Transistors Fighting = Flip-Flop
Transistors react instantly. When their base voltage crosses a certain level, they switch fast.
Because each transistor’s ON-state forces the other OFF:
- Only one LED can be ON at a time
- Each transistor waits its turn to recover
- They continually force each other to switch states
It’s like musical chairs with only one chair.
🧐 Q&A: LED Blinker Circuit
Question #1 (Multi-Part):
Let’s say that when I turn the circuit on that the red LED comes on initially. Does that mean positive electrons are coming from the positive terminal of the 9V battery — through the red LED to the collector of Q1 — or just to the anode of the capacitor C1? Is capacitor C2 charged initially — not allowing current to flow through the blue LED?
Answer #1 (Multi-Part):
Let’s answer using conventional current flow (the way schematics are drawn: current flows from + to –), but briefly mention electrons too so it all lines up.
1. What happens at the very instant you power it on?
At the exact moment you connect the battery:
- Both capacitors (C1 and C2) are uncharged.
- That means there is initially no voltage across either capacitor.
- So electrically, at that instant, the capacitors behave almost like just short wires (for a very brief moment).
Nothing is “pre-charged.” There’s no stored energy yet. Both sides start in a neutral state. Also, because of tiny differences (transistor gain, wiring, etc.), one transistor will “win” and turn on first. Let’s say that’s Q1 (the red LED side).
2. When red LED is on, where is the current flowing?
Let’s stick to conventional current (from + to −). If the red LED is on, that means Q1 is ON (conducting), and the current path is roughly:
- from positive (+) battery terminal
- to red LED series resistor (R1)
- to red LED
- to Q1 collector
- to Q1 emitter
- to ground (− battery terminal)
So to answer this part of the question:
“Does that mean positive electrons are coming from the positive terminal of the 0V battery — through the red LED to the collector of Q1 — or just to the anode of the capacitor C1?”
The important points:
- Yes, current is flowing from the positive battery terminal, through the red LED and its resistor, into the collector of Q1, then out the emitter to ground.
- Also, the collector node (where LED, resistor, and C1 connect) is feeding both:
- The collector of Q1
- The “+” side of C1 (and/or C2, depending on your exact wiring)
So the LED isn’t only feeding the capacitor—its node is shared:
- That node is where the LED, the capacitor, and the transistor collector all meet.
- Current to light the red LED goes into Q1’s collector.
- Separately, some current can also flow into C1 to start charging it, depending on the base/emitter conditions on the other side.
So, both happen—the LED forward current into Q1 and some current into the capacitor to charge it.
3. Is C2 “charged initially” to block the blue side?
The short answer? No – not at the instant you power up. C2 is not pre-charged. It starts at 0V like C1.
What does prevent the blue LED from turning on initially is not a pre-charged capacitor but the fact that:
- Q1 “wins” and turns ON first.
- When Q1 turns ON, its collector voltage drops low.
- Through the cross-coupling network, that sudden low voltage on Q1’s collector is sent via the capacitor to Q2’s base, yanking Q2’s base down and forcing Q2 firmly OFF for a moment.
Let’s break that down more cleanly:
3a) At power-up, both sides try to turn on
- Both transistors Q1 and Q2 have similar bias networks (their base resistors [see Answer #2] and such).
- As the voltage rises from 0 to 9V, both bases start to get some forward-bias (they both “want” to turn on).
But in reality, due to tiny differences (one transistor is slightly faster / has slightly higher gain / a tiny wiring difference), one transistor gets ahead—let’s say Q1.
3b) Q1 turning on first affects Q2 via C1
When Q1 suddenly turns ON:
- Its collector voltage drops from “near 9V” to “near ground.”
- C1 was initially uncharged, so its voltage started at 0V across it.
- One side of C1 (collector side) suddenly drops—this causes the other side (base of Q2) to be momentarily pulled downward (more negative than it was), because capacitors resist sudden changes of the voltage across them.
That “downward tug” on Q2’s base:
- Drives Q2’s base below its normal forward-bias region.
- That forces Q2 OFF, even if Q2’s base resistor is trying to nudge it ON from the supply.
So it’s not that C2 is charged from the start preventing current in the blue LED path. Instead, it’s that Q1’s sudden ON event, via capacitor coupling, actively kicks Q2 OFF, and only after time passes do the capacitors charge up and release their hold.
4. Over time, caps charge and release control
Once Q1 is ON and Q2 is OFF:
- The capacitor (C1) connected between Q1’s collector and Q2’s base:
- Starts with some “displacement” voltage because of the initial kick.
- Then slowly charges or discharges through the resistors to a more steady state.
- As C1’s effect fades (its charging finishes), Q2’s base voltage slowly rises again.
- Eventually Q2’s base reaches the point where Q2 turns ON.
- When Q2 turns ON, the whole process happens in reverse:
- Q2’s collector slams low.
- The capacitor connecting Q2’s collector and Q1’s base (C2) now kicks Q1’s base low, turning Q1 OFF.
- Now the blue LED is ON, and the red one is OFF.
The capacitors aren’t “blocking the LED path” like a valve; they’re kicking the opposite transistor’s base up or down and then slowly “letting go” over time.
5. Quick answers to this multi-part question:
First Part: “Does that mean positive electrons are coming from the positive terminal of the 0V battery — through the red LED to the collector of Q1 — or just to the anode of the capacitor C1?”
- Using conventional current:
- Yes, current flows from the positive (+) terminal of the 9V battery, then flows to the red LED (and its resistor), then to the shared node (consisting of the LED, capacitor, and Q1), then into Q1’s collector, out of Q1’s emitter, and then to ground.
- That shared node also connects to the capacitor, so some current also charges the capacitor.
- So it’s not “either/or”. The node feeds both Q1’s collector and C1’s anode.
Second Part: “Is capacitor C2 charged initially — not allowing current to flow through the blue LED?”
- No, C2 is not charged initially. At the instant of power-up, both C1 and C2 are effectively uncharged.
- What prevents the blue LED (Q2) from turning on is Q1 winning the race and then, via its capacitor link, pulling Q2’s base low so Q2 is shut off.
- Over time, the capacitors charge and the situation flips, making the LEDs alternate.
6. Quick note on “positive electrons” wording
Just to keep terms straight:
- In electronics, we usually talk about conventional current flowing from positive-to-negative.
- Electrons actually move from negative-to-positive, but most schematics, formulas, and explanations use the conventional direction.
- So when we say “current flows from the positive terminal through the LED,” we mean conventional current, not literal electron direction.
Question #2:
So, if we’re saying that the red LED “wins” initially and turns on first when the 9V supply is connected to the circuit — current is flowing through R1, then through the red LED (D1), to the collector of the transistor (Q1), through Q1’s emitter, to ground. Doesn’t the base of Q1 have to have some current initially to “turn on” Q1, for current to flow from collector-to-emitter? If so, how’s that happening, initially?
Answer #2:
Correct. A transistor can’t turn ON unless its base gets some current.
So… if Q1 (red side) turns on first, how did Q1’s base get that current before anything else was happening?
Both transistor bases are getting some current the moment the circuit powers up. They both start to turn on at the same time.
But one transistor turns on slightly faster, and that makes all the difference. Let’s go over how:
🔋 Step 1 — Right when power is connected
At the instant you connect the 9V battery, both base resistors (not shown in the schematic diagram above) immediately start feeding current:
- Q1’s base gets some current through its base resistor
- Q2’s base gets some current through its base resistor
- Both transistors begin to “wake up”
In other words, both LEDs want to turn on at the same time. There is no requirement that one side gets “special treatment.”
“Wait, wait, wait-a-minute! You just said something about ‘base resistors.’ There’s NO base resistors in our LED Blinker Circuit!”
Ah — PERFECT clarification. And guess what? Your circuit does have base resistors — they just aren’t sitting directly on the bases in the usual way.
The LED Blinker Circuit diagram shows:
- Two collector resistors: R3 and R4
- Two LED current-limiting resistors: R1 and R2
- Two capacitors: C1 and C2
- And NO obvious “base resistors”
But in a two-transistor astable multivibrator, the collector resistors also act as the base-bias resistors through the capacitors. We’ll get more into this, in the next question.
Back to what we were talking about, and on to Step 2:
🟡 Step 2 — But the two transistors are NOT perfectly identical
This is the crucial truth:
- One transistor has slightly higher gain
- One needs slightly less voltage to start turning on
- One has slightly different internal leakage
- ONE base wiring path has a few picofarads less stray capacitance
- One capacitor is soldered/wired in a slightly different physical position
Let’s say Q1 turns on 100 nanoseconds earlier than Q2. That tiny lead is enough to decide everything.
🔴 Step 3 — Q1 turns ON slightly earlier → its collector voltage drops
When Q1 begins turning ON:
- Q1 starts pulling its collector toward ground
- That collector node is connected to the positive side of C1
- So when Q1’s collector suddenly drops…
C1 pulls Q2’s base downward because capacitors resist sudden voltage changes. This “downward tug” on Q2’s base:
- Cancels the current that the “base resistance” was supplying
- It drives Q2’s base BELOW 0.7V
- And this forces Q2 OFF completely
And that’s how Q1 “wins.”
🤔 So exactly how did Q1 get its initial base current?
Because its base resistor is connected to +9V. There is nothing else special happening. The moment power is applied:
- A resistance feeds Q1’s base-bias
- A resistance feeds Q2’s base-bias
- Both bases get current immediately
One wins because of extremely small manufacturing differences — not because something special happens to one capacitor or one LED.
This is exactly why sometimes Q2 wins instead of Q1. If you reverse the transistors physically on the breadboard, or change the temperature, or swap part tolerances the LED that wins can randomly change.
🏃➡️🏃♂️➡️ Visualization: think of two runners leaving a starting line

Both runners get the starting signal at the same time. Both accelerate the same way — in theory. But one runner has:
- 0.00001% stronger legs
- or 0.00001% more traction
- or 0.00001% better reaction time
That runner gets one tiny step ahead, and then suddenly throws a giant wall across the other runner’s lane, forcing the other to stop dead. That “giant wall” is the capacitor pulling the other transistor’s base down.
✔ Both base resistors feed base current immediately
✔ One transistor turns on slightly faster
✔ Its collector voltage drops
✔ The capacitor connected to it pulls the other base low
✔ The “slower” transistor is forced completely off
✔ The “faster” one becomes the winner and lights its LED
Then, as the capacitors charge and discharge, control flips back and forth.
Question #3:
Earlier, you mentioned base resistors. There aren’t any base resistors shown on the provided schematic diagram for the LED blinker circuit. Am I missing something?
Answer #3:
No, and thank you for reminding me about this. I did say that I would get back to this. We left of stating that the collector resistors also act as the base-bias resistors through the capacitors.
In your circuit, the base gets its operating current THROUGH the capacitor and the collector resistor of the other transistor.
Yes — the base current flows through a capacitor, and at first, that may seem impossible, because capacitors “block DC,” but not during the first instant when the voltage is changing (and at startup, everything is changing). Let’s go over this, step-by-step.
🤔 What Biases the Bases in Your Circuit?
Let’s take a look at the following paths:
Path for base current of Q1:
- This path goes from +9V, to R4, to Q2’s collector node, to C2, then on to Q1’s base.
Path for base current of Q2:
- This path goes from +9V, to R3, to Q1’s collector node, to C1, then on to Q2’s base.
- Yes — the base is actually fed through:
- a resistor (R3 or R4),
- a collector node, and
- a capacitor.
This circuit depends on the fact that at startup, capacitors act like momentary short circuits. That allows current to flow into the base even though in steady DC they block.
So, at the moment power is applied, BOTH capacitors allow current to flow straight into each base, so BOTH transistors begin to switch on.
🤔 So how does Q1 turn ON first if there’s no traditional base resistor?
Because the base current is coming from this path:
- Q1’s base current comes from the +9V battery supply, to R4, to Q2’s collector, to C2, and on to Q1’s base.
At startup, C2 initially has 0V across it, so it behaves like a wire. That means the base of Q1 is directly connected to R4 during the first instant, and simultaneously:
- Q2’s base current comes from +9V battery supply, to R3, to Q1’s collector, to C1, and on to Q2’s base.
Same logic. So both transistors start receiving base current immediately at power-up. Which one “wins” the race to switch fully on first is purely random, based on tiny manufacturing differences, and because both are biased in the same way at the same time.
And back to the question, “Doesn’t the base of Q1 have to have some current to turn on?”
YES, it does. And it does get that current — through the capacitor and the collector resistor of the opposite transistor. That is the “hidden” base-bias path.
🤔 What happens the instant the red side wins?
Let’s say Q1 switches on a hair faster. That means Q1’s collector drops suddenly and that sudden drop appears across C1. That forces Q2’s base downward and that drives Q2 OFF completely.
And THAT is how one transistor becomes dominant, even though both start with base current flowing to them.

Question #4:
When you say “Q1’s collector drops suddenly,” and “That sudden drop appears across C1,” what do you mean by that?
Answer #4:
Great — this is the question that unlocks the entire behavior of the astable multivibrator — our LED blinker circuit. Let’s break this down with absolute clarity, no assumptions, and no missing steps.
⚡️ First: What is the collector voltage before Q1 turns on?
Imagine power is applied, and neither transistor is really on yet. Consider the node at Q1’s collector (this node also connects to the red LED and to one side of capacitor C1):
- It is connected to +9V through R3.
- When Q1 is OFF, no current is flowing from the collector into Q1.
- That means the collector “floats upward” through R3 toward the +9V supply.
So before Q1 switches on, Q1’s collector voltage is close to +9V. This is the “high” collector state. Keep this value in your head: the collector is HIGH (~9V).
💡 Next: What happens when Q1 begins to turn ON?
A transistor that is ON behaves like this:
- The collector gets connected to the emitter through the transistor.
- The emitter is at ground (0V).
- Therefore the collector is pulled down toward ground.
So when Q1 turns ON, Q1’s collector voltage suddenly falls from ~9V down to almost 0V. This change is instantaneous on the schematic level — not literally infinite speed, but fast enough (microseconds or less) that the capacitor “sees” it as sudden.
This is what we mean by “Q1’s collector drops suddenly.” It is simply that the collector node voltage falls quickly from about +9V to about 0V.
🔻 Now: What does it mean when we say “That sudden drop appears across C1”?
Let’s look at capacitor behavior:
- A capacitor opposes sudden changes in voltage across it.
- It “tries” to keep the voltage between its two legs the same as it was a moment ago.
- That means if one side of the capacitor suddenly moves, the other side is dragged along in the same direction momentarily.
🌟 This is the golden rule: Capacitors let fast-changing currents through, and resist sudden changes in voltage across them.
So now apply that rule. Before Q1 switched ON, the collector (side of C1 connected to Q1 collector) was at +9V. The base of Q2 (the other side of C1) was somewhere near 0.6V (slightly rising). So the capacitor voltage (difference) was:
\begin{equation}
9V – 0.6V \approx 8.4V
\end{equation}
This is the initial voltage across C1.
🔻 Now Q1 turns ON and collector slams downward
Q1’s collector suddenly moves from +9V to 0V. The capacitor tries very hard to keep the difference between its two sides the same (~8.4V). So if one plate (collector side) suddenly drops by 9V, the capacitor forces the other side (Q2’s base) to also drop by about 9V.
This is the moment we describe by saying “The sudden drop appears across C1.” More precisely, the collector drops, so the Q2 base is dragged downward as well, because the capacitor resists the sudden change in voltage across it.
This drag pulls Q2’s base below ground — sometimes even negative — for a moment. That negative pulse forces Q2 completely OFF.
⭐ Let’s restate this in super plain language
- Q1 collector was high (9V).
- Q1 suddenly switches ON.
- The collector node is pulled to almost 0V very quickly.
- C1 does not allow its voltage to change instantly.
- So when the collector side drops, the base side must also drop to keep the same voltage difference.
- This pulls Q2’s base sharply downward, turning it OFF immediately.
And THAT is how one transistor switching ON knocks the other transistor OFF. That’s the core mechanism of the astable oscillator.
Going Further
You’ve just read the second article to our little subseries to the Circuit Component Super Series — I call it the Astable Multivibrator Subseries.
In the previous companion article, “What Exactly Is an Astable Multivibrator?,” we went over what an astable multivibrator was, we went over some of its history, and then we tried to understand how the LED blinker circuit worked through three differently explained ways.
In the next companion article to this extended topic series for the LED blinker circuit, we’ll go over in far more detail — in more technical detail, if you will — of the LED blinker circuit and how it works. We’ll dive deep for an understanding of it far further than we went over here and in our previous discussion, like:
- How the circuit achieves oscillation
- Why the capacitors are polarized the way they are
- Why the blinking speed is the way that it is
- Where the blinking rate comes from
- What sets timing
- More Q&As
- and much more!
So, stick around for more on the astable multivibrator — the LED blinker circuit we made and learn more of how it works, how to figure out to manipulate it more to your liking, and gain a better understanding of how components work together to create fantastic things. Go further and check out the companion article to this one, Gaining a Deeper Understanding of the LED Blinker Circuit (An Extended Topic for the LED Blinker Circuit).