Up next in 10

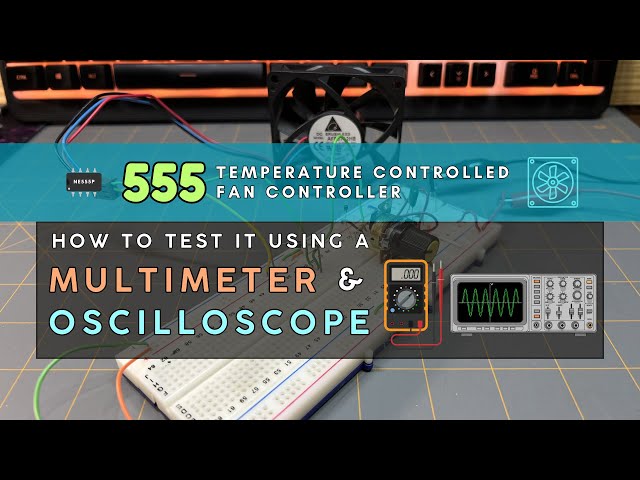
How to Test the 555 Temperature-Controlled Fan Controller Using a Multimeter and Oscilloscope
Jan 28, 2026

This is a companion video for our Circuit Component Super Series at Motbots.com. In this video we show how to test the 555 Temperature-Controlled Fan Controller using a multimeter and oscilloscope. Build video of the circuit linked below:
Making a 555 Temperature-Controlled Fan Controller
➡️ https://youtu.be/UkDahNnKr4I
This circuit is from the circuit build instructional content in Part 4 of our series titled, "Putting Components to Work: Making a 555 Temperature-Controlled Fan Controller."
It's encouraged that you go check out our Circuit Component Super Series, particularly "Putting Components to Work," to gain a better understanding of how the components used for this circuit work together to control a 12VDC brushless fan using a 555 timer. (Link below)
Video for Our Website Page: "Putting Components to Work: Making a 555 Temperature-Controlled Fan Controller"
Page URL: https://motbots.com/putting-components-to-work-making-a-555-temperature-controlled-fan-controller/
Description: This is a supplemental video for a post made on our website.
Website: https://motbots.com
_________ PROJECT INFO _________
🗺️ Schematic for the 555 Temperature-Controlled Fan Controller https://motbots.com/putting-components-to-work-making-a-555-temperature-controlled-fan-controller/#555-temp-control-fan-schematic
_________ RESOURCES _________
Show More Show Less View Video Transcript
0:00
Okay, welcome back to the 555
0:02
temperature controlled fan controller
0:04
project. This is a supplemental video
0:07
for how to test this circuit using a
0:11
multimeter. As you can see in the
0:13
background here, I have my 12volt uh
0:16
supply. It's currently on and hooked up
0:19
to the breadboard. This is the negative
0:21
probe to the power supply. And this
0:23
alligator clip here is the positive
0:26
probe from the power supply. You can see
0:29
that I have my multimeter here in the
0:31
background. It is currently on. I have
0:34
my multimeter set to 20 volts because
0:37
that was the smallest value of on mine
0:40
that was greater than 12 volts. And I
0:43
have the negative probe of the
0:46
multimeter uh connected to the negative
0:51
uh supply of my breadboard where it's
0:54
also connected to the uh negative supply
0:57
of the power supply over here. And then
1:01
I have my red uh positive probe of the
1:06
multimeter
1:08
sitting right here. And what I want to
1:10
do for my first measurement is to
1:12
measure
1:13
uh VCC at pin 8 on the 555 timer. So
1:18
what I'm going to do is I'm going to
1:19
take my red positive probe from the
1:23
multimeter and I'm going to probe pin 8
1:27
of the 555 timer. And because pin 8 of
1:32
the 555 timer is the VCC pin of the 555,
1:37
we should have a reading on our
1:39
multimeter of about 12 volts, which is
1:42
the same voltage coming from the voltage
1:45
supply or the voltage that we're using
1:47
for our circuit. So, I'm going to take
1:49
my red positive probe from the
1:52
multimeter and touch pin 8 of the 555.
1:56
And you see that we have a voltage
1:58
reading of about 12 volts, which is the
2:01
same as our voltage supply voltage.
2:07
Okay. Next up, we're going to measure
2:10
the sense voltage at room temperature.
2:14
So, the only thing that I've changed is
2:17
uh now I have my red positive probe from
2:22
the multimeter connected to uh the leg
2:26
of the 100k ohm resistor that's at the
2:31
sensor node on my breadboard.
2:34
Uh you can go back and take a look at
2:38
the video of making this circuit making
2:42
the 555 temperature controlled fan
2:45
controller. Go see that video where I
2:49
explain the sensor node and I show you
2:52
where the sensor node is according to my
2:55
setup on the breadboard. So again, I
2:58
have my red positive probe from the
3:01
multimeter connected to the sensor node
3:04
of the circuit on the breadboard. And at
3:07
room temperature, we're currently
3:08
reading 8 volts at the sensor node,
3:12
which is correct because we should be
3:15
reading a voltage at the sensor node
3:17
somewhere between 0 volts and VCC or in
3:21
our case uh 12 volts because we're using
3:25
12 volts uh as our voltage supply. So
3:28
I'm currently having a reading of 8
3:31
volts about 8 volts on my multimeter
3:34
compared to about 7.8 8 volts in my
3:37
initial reading. That's only because I
3:40
adjusted this potentiometer before uh
3:43
recording this time to be at about 8
3:46
volts. So, we can get a better uh look
3:49
at when we start adding heat to the
3:53
circuit later. So, we can see the
3:56
threshold voltages to be about 8 volts
4:00
for when the fan turns off and we remove
4:03
heat. and it'll be about 4 volts when we
4:06
add heat to the circuit for when the fan
4:09
turns on. So, that's the only reason why
4:13
this says about 8 volts now compared to
4:16
7.8 volts or so uh in previous uh videos
4:22
or the previous video of making this
4:23
circuit is because I made an adjustment
4:26
to the potentiometer. It doesn't really
4:27
matter. I just wanted a a kind of a more
4:30
more of an appealing uh readout to be
4:34
more at 8 volts for this demonstration
4:37
here. But again, we should be getting a
4:40
reading between 0 volts and 12 volts in
4:43
our case since we're using a 12vt uh
4:45
voltage supply. So in our case, we have
4:48
about 8 volts.
4:51
Now we want to take a measurement at pin
4:53
3. So before we add heat to the
4:55
thermister, we want to take a voltage
4:58
reading at pin 3. So what I've done here
5:01
is this time I've placed the red
5:04
positive probe coming from the
5:05
multimeter. Uh I have it clamped onto
5:09
the end of this yellow jumper wire here.
5:12
And I have the other end of that yellow
5:13
jumper wire going into a point on the
5:16
breadboard that's in line with pin three
5:18
of the 555. And of course, the black
5:22
negative probe of the multimeter is
5:24
hooked to the negative supply of the
5:28
both the voltage supply and the negative
5:31
supply of the breadboard itself. So,
5:33
initially there should be no voltage or
5:37
zero volts at pin 3 before we even add
5:41
heat to the circuit. So, we got that
5:43
reading. As you can see here, there is
5:46
zero volts being read at pin 3
5:49
currently.
5:52
Okay. What we want to do now is take
5:54
some multimeter readings for when we add
5:57
heat to the circuit. So the first
6:00
measurement we're going to do is take a
6:02
measurement at the sensor node. So
6:05
again, I have attached the red probe of
6:10
the multimeter at the sensor node just
6:13
like I did when we were testing the
6:15
sensor node before. We're adding heat
6:18
and I have my multimeter on. We're
6:20
currently reading at about 8 volts. And
6:23
what should happen when I turn the heat
6:27
gun on in just a minute? That's it's
6:30
going to be over here as well where I'll
6:31
turn it on. When I turn the heat gun on
6:35
and point the heat gun at the
6:37
thermister, we're going to watch the
6:38
multimeter and we should observe the
6:41
voltage reading go initially from room
6:44
temperature voltage that we measured
6:46
earlier, which is currently at about 8
6:48
volts, and it's going to gradually go
6:51
down. So, let me go ahead and turn
6:55
the heat gun on.
6:57
I'm going to point the heat gun at the
6:59
thermister. The voltage is dropping. The
7:02
fan has kicked on at about 4 volts. The
7:04
fan is cooling the circuit
7:07
and the fan has turned off at about 8
7:11
volts.
7:14
Okay. Now we want to take a measurement
7:16
at pin three when we add heat to the
7:19
circuit. So when we initially add heat
7:21
to the circuit at the thermister,
7:24
we should see an instant voltage change
7:27
at pin three. So, I've placed the red
7:30
probe of the multimeter at the end of
7:34
this yellow jumper wire. And again, that
7:37
end of the yellow jumper wire is at a
7:40
point on the breadboard in line with pin
7:42
three of the 555 timer. So, our voltage
7:45
reading at pin 3 once heat is initially
7:48
added to the circuit should be around 0
7:51
volts and it currently is at 0 volts.
7:54
This is because there's not been any
7:57
sufficient amount of heat buildup for
7:59
the sensor node to trigger the fan to
8:01
turn on. So once we add heat to the
8:04
thermister, we should see a change in
8:07
this voltage immediately. So what I'm
8:09
going to do is I'm going to turn my heat
8:12
gun on
8:14
and point the heat gun down to the
8:16
thermister.
8:18
The fan just kicked on and we see that
8:20
the voltage
8:22
immediately came up to about 11 volts,
8:26
which is what we should be reading. And
8:28
we should see it go right back down to
8:29
zero volts as soon as the fan turned off
8:31
and the fan is off.
8:34
Okay. Now, we want to do some
8:36
oscilloscope checks for the 555
8:38
temperature controlled fan controller.
8:40
So, if you have an oscilloscope, you can
8:42
make a couple of checks on your circuit
8:44
to see how things are working. The model
8:47
oscilloscope that I'm using is a HET
8:49
DSO5102P
8:53
just in case you wanted to know. All you
8:55
need to do is take your probes and place
8:57
them in the following manner. So I took
9:00
my channel one probe which is uh my
9:05
yellow line on the screen
9:08
and I have it connected to my sensor
9:12
node. At least I have the positive end
9:14
of the probe connected to the sensor
9:16
node. All I did was connect it at that
9:18
same 100k ohm resistor like we did
9:21
during the multimeter checks. And I
9:24
placed the negative alligator clip of
9:27
the probe onto this black jumper wire
9:30
that's going to one of the points on the
9:34
negative uh supply rail back here on the
9:37
breadboard. And then I took my channel
9:39
two probe, the blue probe, which is
9:41
represented by the blue line on the
9:44
screen of the oscilloscope, and I have
9:46
it connected or its positive end of the
9:50
probe connected to this yellow jumper
9:52
wire going to a point that's in line
9:56
with pin three of the 555 timer. And you
10:01
don't need to connect the negative
10:03
supply alligator clip of the channel 2
10:06
probe. You can see mine is laying right
10:09
here. It's not connected to anything.
10:11
You don't need to connect the negative
10:12
supply alligator clip of the channel 2
10:14
probe because both probe tips are
10:18
measuring nodes in the same circuit. All
10:20
oscilloscope probe ground clips are
10:23
internally connected together and are
10:25
also connected to earth ground through
10:27
the scope's power cord. So because of
10:30
this, you only need to connect one of
10:32
the ground clips. Our circuit has a
10:34
single common ground and we already
10:37
connected one ground clip properly and
10:39
that was this one over here from the
10:41
channel one probe going to uh the
10:45
negative supply of the breadboard. This
10:47
is very common and totally acceptable in
10:49
low voltage electronics. So, what I'm
10:52
going to do is I'm going to take my heat
10:54
gun and I'm going to point it to the
10:57
thermister again. And we want to observe
11:00
the outputs to the screen of the
11:02
oscilloscope. Again, the yellow line
11:04
represents channel one probe, which is
11:07
this probe here at the sensor node, and
11:11
the blue line represents the channel 2
11:14
probe, which is connected to pin three
11:18
of the 555 timer. So again, what I'll do
11:21
is I'll add heat to the circuit at the
11:24
thermister. When we add heat to our
11:26
circuit, but before the fan kicks on, we
11:28
should observe that the voltage at the
11:31
sensor node gradually drop in voltage.
11:34
So we should see the yellow line
11:35
gradually drop down on the screen in
11:38
voltage. And currently the yellow line
11:41
is sitting at about 8 volts. And then
11:44
the line should gradually decline in
11:46
voltage as time goes on and heat is
11:48
added to the circuit. So we should see
11:50
that happen on the screen where the
11:51
yellow line will gradually go down in
11:54
voltage. So once a sufficient amount of
11:56
heat is added to our circuit at the
11:59
sensor node and the lower threshold
12:01
voltage has been reached that would be
12:03
around 12 volts the fan should turn on.
12:06
That threshold voltage again should be
12:08
around 4 volts. And when the fan turns
12:10
on, we should see the blue line, which
12:14
again is our channel two probe going to
12:17
pin three of the 555 timer. We should
12:20
see the blue line when the fan kicks on
12:23
immediately jump up in voltage on the
12:26
screen. And remember earlier when we
12:28
made tests to pin 3 using the
12:30
multimeter, it was initially at 0 volts
12:33
and we added heat to the circuit. And
12:35
when the fan kicked on, the voltage
12:38
immediately jumped up to around 11
12:40
volts. And then once we remove heat from
12:43
the circuit, we want to observe what's
12:45
happening at our test points. So at that
12:47
point, we should start seeing the yellow
12:50
line gradually rise up in voltage. And
12:54
then when the fan turns off, we should
12:56
see a sharp drop in voltage for the blue
13:00
line. And the blue line will be reading
13:02
again at zero volts. And just FYI, this
13:08
multimeter is currently attached to the
13:11
incoming voltage supply. Just so we can
13:14
see the voltage supply because I
13:15
couldn't fit it into the the camera shot
13:18
here. So that's what this uh voltage is
13:22
currently reading right now on the
13:23
multimeter. It's just our voltage supply
13:26
currently, the 12vt supply. It's not
13:29
connected to anything else within the
13:32
circuit. So, what I'm going to do now is
13:34
turn on my heat gun
13:36
and I'm going to point the heat gun down
13:39
at the thermister. We see the yellow
13:42
line dropping. That's our probe one. The
13:45
fan is turned on and we see that the
13:47
blue line jumped up sharply.
13:50
The fan is still on. Once it turned off,
13:53
we see the blue line drop sharply
13:56
and it's at zero volts. So, what I'm
13:58
going to do is I'm going to do that
13:59
again so we can see it again. The yellow
14:02
line is dropping slowly.
14:05
The fan kicked on. We see the blue line
14:07
jump up.
14:10
I removed the heat. The yellow line is
14:12
gradually going back up in voltage.
14:15
The fan just turned off. We see the
14:17
voltage drop on the blue line there on
14:19
the screen. And I'm going to do it a
14:22
third time so we can watch. I won't
14:23
speak.
14:37
How about one more time for fun?
14:57
Okay, I have you at a different camera
14:59
angle this time so we can get a better
15:01
look of what's happening on the screen.
15:03
So, I'm going to point my heat gun at
15:06
the thermister.
15:09
See the yellow line dropped and then the
15:10
fan turned on and the blue line jumped
15:12
up.
15:14
Remember
15:16
the yellow line represents
15:21
our probe at the sensor node and the
15:24
blue line represents
15:26
our probe at pin three of the 555 timer.
15:31
So when I point the heat gun to the
15:35
thermister, we should see the yellow
15:36
line gradually drop and then once the
15:39
fan kicks on, the blue line immediately
15:42
jump up in voltage.
15:51
And then once the fan kicks off, we
15:53
should see that blue line immediately
15:55
drop down in voltage.
16:02
One more time. Heat added to the
16:04
circuit. Yellow line dropping.
16:08
Blue line jumps up soon as the fan kicks
16:10
on. Now the yellow line is gradually
16:12
going back up as the circuit cools
16:15
and the fan kicks off and the blue line
16:17
immediately drops down to zero volts.
#Electronics & Electrical
#Electrical Test & Measurement